Last updated on 2022. 12. 08.
라즈베리파이3 에 CentOS 7 을 한번 설치 했었는데 다시하고 있습니다. 처음에 Gnome GUI 버전으로 설치하긴 했는데 왠지 무겁고 마음에 안 들어서 Minimal 설치 하고 간단한 설정까지 정리하였습니다.
1. Minimal 설치 후 root 암호 변경
처음 로그인은 root 암호는 centos 를 입력합니다. 바로 암호를 변경해 주도록 합시다.
[root@localhost ~]# passwd
2. 무선 랜 설정하기
여기서는 무선 랜 환경을 그대로 사용하려고 합니다.
[root@localhost ~]# nmcli d  // 무선 네트워크 목록과 이름을 확인한다.
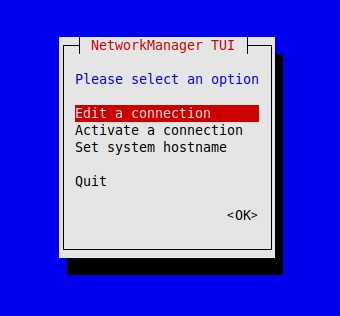
[root@localhost ~]# nmtui    // 무선 네트워크 설정 화면
그러면 다음과 같은 화면이 나온다.

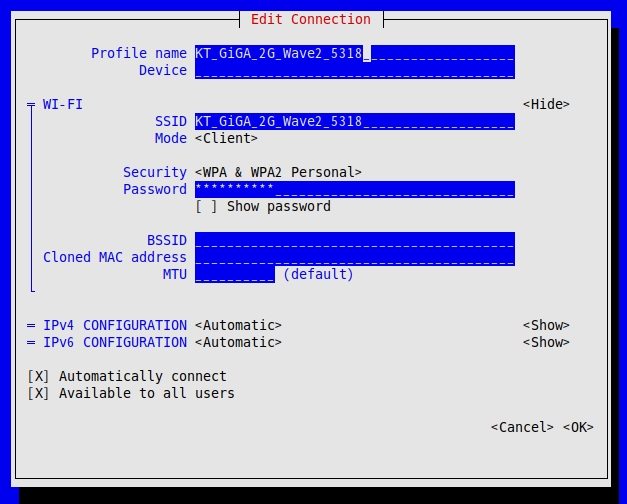
여기서 Edit a connection – 오른쪽에 Add – Wifi 를 누르고 설정합니다.

Profile name 은 적당히 알아볼 수 있게 적어줍니다.
SSID 는 아까 위에서 nmcli d 명령으로 확인 한 접속하려는 무선 네트워크 이름을 정확히 입력한다.
Security 는 WPA&WPA2 Personal 로 설정하고 밑에 와이파이 접속 암호를 입력한다.
OK를 누르면 와이파이가 자동 활성화 되면서 이제 무선 인터넷을 사용할 수 있는 상태가 된다.
3. SD카드 용량 늘리기
df -h 명령으로 확인해 보면 SD카드의 용량이 적은데, 아직 파티션에 할당되지 않은 용량이 있어서 그렇다. 다음의 명령을 실행하여 자동으로 용량을 최대로 늘려줍니다.
[root@localhost ~]# /usr/bin/rootfs-expand
4. Timezone 설정
사용가능한 Timezone 을 검색하고 변경 합니다.
[root@localhost ~]# timedatectl list-timezones | grep Seoul
Asia/Seoul
[root@localhost ~]# timedatectl set-timezone Asia/Seoul
5. Epel 저장소 추가
vi 편집기를 사용하여 Epel 저장소를 추가 합니다. 더 많은 패키지 list 를 활용할 수 있습니다.
[root@localhost ~]# vi /etc/yum.repos.d/epel.repo

[epel]
name=Epel rebuild for armhfp
baseurl=https://armv7.dev.centos.org/repodir/epel-pass-1/
enabled=1
gpgcheck=0
6. yum 을 이용하여 패키지 업데이트
이제 패키지를 업데이트 합니다. 시간이 좀 걸릴수도 있습니다. 만약 패키지 list 를 업데이트 하는데도 접속서버가 이상하여 너무 많은 시간이 걸린다면 패키지 리스트만 업데이트 하고 설치화면에서 잠시 N 을 눌러 줍니다.
[root@localhost ~]# yum update
(옵션사항) 만약 패키지 미러사이트가 너무 느리다면 화웨이 미러로 변경을 추천 합니다. 상당히 빠릅니다. mirrorlist 를 주석처리하고 화웨이 미러를 직접 추가해 줍니다. 아래 파란색이 수정한 부분입니다.
[root@localhost ~]# vi /etc/yum.repos.d/CentOS-Base.repo

[base]
name=CentOS-$releasever - Base
#mirrorlist=http://mirrorlist.centos.org/?release=$releasever&arch=$basearch&repo=os&infra=$infra
#baseurl=http://mirror.centos.org/altarch/$releasever/os/$basearch/
baseurl=http://mirrors.huaweicloud.com/centos-altarch/$releasever/os/$basearch/
gpgcheck=1
enabled=1
gpgkey=file:///etc/pki/rpm-gpg/RPM-GPG-KEY-CentOS-7
file:///etc/pki/rpm-gpg/RPM-GPG-KEY-CentOS-SIG-AltArch-Arm32

#released updates
[updates]
name=CentOS-$releasever - Updates
#mirrorlist=http://mirrorlist.centos.org/?release=$releasever&arch=$basearch&repo=updates&infra=$infra
#baseurl=http://mirror.centos.org/altarch/$releasever/updates/$basearch/
baseurl=http://mirrors.huaweicloud.com/centos-altarch/$releasever/updates/$basearch/
gpgcheck=1
enabled=1
gpgkey=file:///etc/pki/rpm-gpg/RPM-GPG-KEY-CentOS-7
file:///etc/pki/rpm-gpg/RPM-GPG-KEY-CentOS-SIG-AltArch-Arm32

#additional packages that may be useful
[extras]
name=CentOS-$releasever - Extras
#mirrorlist=http://mirrorlist.centos.org/?release=$releasever&arch=$basearch&repo=extras&infra=$infra
#baseurl=http://mirror.centos.org/altarch/$releasever/extras/$basearch/
baseurl=http://mirrors.huaweicloud.com/centos-altarch/$releasever/extras/$basearch/
gpgcheck=1
enabled=1
gpgkey=file:///etc/pki/rpm-gpg/RPM-GPG-KEY-CentOS-7
file:///etc/pki/rpm-gpg/RPM-GPG-KEY-CentOS-SIG-AltArch-Arm32

#additional packages that extend functionality of existing packages
[centosplus]
name=CentOS-$releasever - Plus
#mirrorlist=http://mirrorlist.centos.org/?release=$releasever&arch=$basearch&repo=centosplus&infra=$infra
#baseurl=http://mirror.centos.org/altarch/$releasever/centosplus/$basearch/
baseurl=http://mirrors.huaweicloud.com/centos-altarch/$releasever/centosplus/$basearch/
gpgcheck=1
enabled=0
gpgkey=file:///etc/pki/rpm-gpg/RPM-GPG-KEY-CentOS-7
file:///etc/pki/rpm-gpg/RPM-GPG-KEY-CentOS-SIG-AltArch-Arm32
하는 김에 kernel repo 도 화웨이 미러로 변경 합니다.
[root@localhost ~]# vi /etc/yum.repos.d/CentOS-armhfp-kernel.repo

[centos-kernel]
name=CentOS LTS Kernels for $basearch
#mirrorlist=http://mirrorlist.centos.org/?release=$releasever&arch=$basearch&repo=kernel-kernel-$kvariant&infra=$infra
#baseurl=http://mirror.centos.org/altarch/7/kernel/$basearch/kernel-$kvariant
baseurl=http://mirrors.huaweicloud.com/centos-altarch/7/kernel/$basearch/kernel-$kvariant
enabled=1
gpgcheck=1
gpgkey=file:///etc/pki/rpm-gpg/RPM-GPG-KEY-CentOS-7
file:///etc/pki/rpm-gpg/RPM-GPG-KEY-CentOS-SIG-AltArch-Arm32
위와같이 바꿔주고 다시 yum update 를 실행하여 패키지를 업데이트 해 줍니다.
7. SELinux 끄기
CentOS7 부터는 방화벽을 firewall-cmd 를 통해서 제어하기 때문에 SELinux 를 보통 끈다고 하네요.
[root@localhost ~]# vi /etc/sysconfig/selinux

SELINUX=enforcing →disabled 로 변경하고 저장하고 나오기
8. ntp 설정
인터넷 시간 동기화 하는 방법 중 하나 입니다. 다음과 같이 입력하여 설치 합니다.
[root@localhost ~]# yum install ntp
설치하고 나서 ntp 서비스를 사용할 수 있도록 방화벽을 설정 합니다.
[root@localhost ~]# firewall-cmd --add-service=ntp --permanent
success
[root@localhost ~]# systemctl start ntpd
9. Kdump service 관련 설정
부팅할 때 Kdump 오류 메시지를 출력할 때가 있는데, 다음과 같이 입력합니다.
[root@localhost ~]# systemctl start kdump

Job for kdump.service failed because the control process exited with error code. See "systemctl status kdump.service" and "journalctl -xe" for details.

[root@localhost ~]# journalctl -xe

...생략...

-- Unit kdump.service has begun starting up.
Jun 18 22:38:12 localhost kdumpctl[8568]: Kdump is not supported on this kernel
Jun 18 22:38:12 localhost kdumpctl[8568]: Starting kdump: [FAILED]
Jun 18 22:38:12 localhost systemd[1]: kdump.service: main process exited, code=exited, status=1/FAILURE
Jun 18 22:38:12 localhost systemd[1]: Failed to start Crash recovery kernel arming.

...생략..
다음과 같이 나오면 해당 서비스가 지원이 안되는 것이니 서비스 비활성화 시킵니다.
[root@localhost ~]# systemctl disable kdump

Removed symlink /etc/systemd/system/multi-user.target.wants/kdump.service.
여기까지 Minimal 설치 1부 입니다. 2부에서는 위의 설정에 이어서 웹서버 설치를 다루어 보겠습니다.
